Installation
This page offers instructions for first time installs and subsequent updates. Half the fun of this platform is that it is always evolving with new modules and capabilities. Once you have the Arduino tools installed, you can check for DreamakerFX updates which bring with them new capabilities and enhancements!
First time installation
The DreamMaker FX hardware currently supports Windows 10, OS X, and probably Linux. If you’re running Windows 7, there are a few additional steps that are required to get the UF2 USB device drivers installed.
First order of business, let’s go download some free software and get rolling.
Download and install the Arduino IDE: https://www.arduino.cc/en/main/software
Accept the defaults
You may be prompted to install several additional drivers; install them.
If you’re running OS X Catalina, make sure you’re using Arduino v1.8.10 or later.
Click
Finishwhen the installs are complete.
Plug the Dream Lemur into an outlet, and connect to a USB port on your computer with a MicroUSB cable. Make sure the USB cable you are using is not a charging cable. There are lots of microUSB charging cables out there that just have wires for power and ground and no data! If you don’t see the
DM_FXdrive/volume show up on your computer, you may need to put your pedal into bootloader mode. See the Troubleshooting section for details on how to do this.Install the DreamMaker FX Arduino board package In the Arduino IDE:
Navigate to either
File->Preferenceson Windows, orArduino->Preferenceson Mac. If you’re using Linux, we assume you’re enough of a bad ass to figure out what to do.In the preferences window, find the text field toward the bottom called
Additional Boards Manager URLs.Copy and paste the following into that text field:
https://runjumplabs.github.io/arduino-board-index/package_dreammaker_fx_index.jsonClick OK to close the preferences window.
Navigate to
Tools->Board->Board Manager.Either type
dreamin the search box, or scroll down until you findDreamMaker FX by Run Jump Labs.Click
Install. This will take a few minutes; then hitClose.
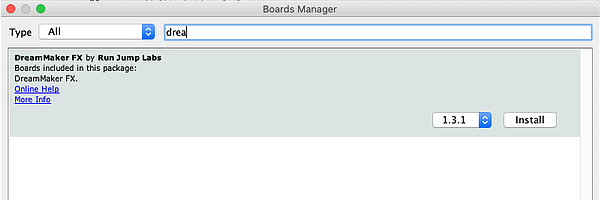 DreamMaker FX package
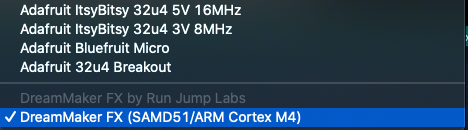
Select the DreamMaker FX hardeare
Navigate to
Tools->Board. At the very bottom of the list you should seeDreamMaker FX (SAMD51/ARM Cortex M4. Select it.
 DreamMaker FX package
Make some bitchin’ effects and play some rock and/or roll very loudly.
The setup process is very similar to Adafruit boards which use the same Arduino processor (Atmel SAMD51 family). This page may offer some additional help https://learn.adafruit.com/adafruit-metro-m4-express-featuring-atsamd51/setup.
Updating the DreamMaker FX Arduino package
There are always updates happening with new effects, bug fixes and improvements! When you do a first time install, you’ll have the latest and greatest. However, it’s always good to check back to see if there are updates.
In the Arduino program:
Navigate to
Tools->Board->Board Manager.Either type
dreamin the search box, or scroll down until you findDreamMaker FX by Run Jump Labs.Select the latest version from the pull-down menu; then hit
Update
A cool feature is that the firmware running on the DSP is automatically updated the first time you download a sketch after an update to the latest version. When you download the effect, you’ll see some messages in the serial monitor that the update is happening (just takes a few seconds). The firmware update only happens when the system detects that the firmware on the DSP is a different version than what is running in the Arduino code.